> ## Documentation Index
> Fetch the complete documentation index at: https://docs.doman.id/llms.txt
> Use this file to discover all available pages before exploring further.

# SSE Notification Drop Down Button

> Modular Notification display with SSE

## SSE Notification Dropdown Component Documentation

### 1. Overview

This document provides instructions for developers on how to implement and use the real-time SSE (Server-Sent Events) notification dropdown component. The component is built with Vue.js 2 and is designed to work with a Laravel backend. It supports two real-time update methods: a simple Database Polling stream and a high-performance Redis Pub/Sub stream.

#### Key Features

* **Real-Time Updates:** Pushes notifications from the server to the client without page reloads.
* **Dual Backend Support:** Choose between simple polling or high-performance Redis.
* **Highly Customizable:** Uses props and slots for easy customization of appearance and behavior.
* **Efficient:** Far more resource-friendly than traditional client-side polling (e.g., `setInterval`).
* **Standalone:** Manages its own state, including unread counts and notification lists.

***

## 2. Frontend Usage (Vue Component)

<img src="https://mintcdn.com/doman/AFdps05QXZDpD9cn/images/vue/sse-notification-ui.png?fit=max&auto=format&n=AFdps05QXZDpD9cn&q=85&s=8301cac72ed86535d2897131f6c4cf47" alt="SSE Notification Dropdown" width="291" height="467" data-path="images/vue/sse-notification-ui.png" />

This section covers how to integrate the `NotificationDropdown.vue` component into a parent Vue component or Blade file.

### 2.1. Prerequisites

Ensure you have `axios` installed in your project for the "Mark all as read" functionality.

```bash theme={null}
npm install axios
```

### 2.2. Component Props

| Prop                   | Type   | Required | Default           | Description                                                          |
| :--------------------- | :----- | :------- | :---------------- | :------------------------------------------------------------------- |
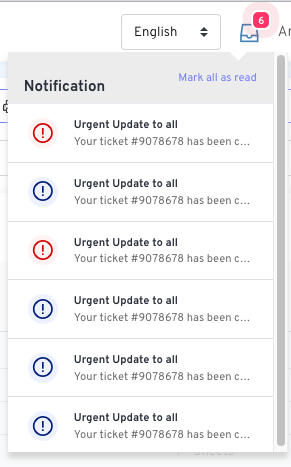
| `title`                | String | No       | `'Notifications'` | The title displayed at the top of the dropdown list.                 |
| `sseUrl`               | String | Yes      | `-`               | The URL endpoint for the Server-Sent Events stream.                  |
| `markReadUrl`          | String | Yes      | `-`               | The URL endpoint for the "Mark all as read" POST request.            |
| `initialNotifications` | Array  | No       | `[]`              | An array of pre-loaded notification objects to display on page load. |
| `initialUnreadCount`   | Number | No       | `0`               | The initial number of unread notifications to display on the badge.  |

### 2.3. Component Slots

#### a. `anchor`

This slot allows you to customize the trigger icon/button for the dropdown.

**Example:**

```html theme={null}
<notification-dropdown ...>
    <template #anchor>
        <i class="fas fa-envelope" style="font-size: 24px;"></i>
    </template>
</notification-dropdown>
```

#### b. `item`

This slot provides full control over how each notification in the list is rendered. It receives the `notification` object as a scoped property.

**Example:**

```html theme={null}
<notification-dropdown ...>
    <template #item="{ notification }">
        <a :href="notification.url" class="custom-item">
            <div class="custom-icon-wrapper">...</div>
            <div class="custom-content">
                <strong>{{ notification.title }}</strong>
                <p>{{ notification.message }}</p>
                <small>{{ notification.created_at }}</small>
            </div>
        </a>
    </template>
</notification-dropdown>
```

### 2.4. Complete Parent Component Example

Here is how you would set up a parent component (or a Blade file with a Vue instance) to use the notification dropdown.

#### a. Blade File (`dashboard.blade.php`)

```php theme={null}
@php
    // Fetch and format initial notifications in the controller that renders this view
    $userId = auth()->id();
    $unreadNotifications = \App\Models\Notification::where(function($q) use ($userId) {
            $q->where('notifiable_id', '=', $userId)
              ->orWhere('notifiable_id', '=', new \MongoDB\BSON\ObjectId($userId));
        })
        ->whereNull('read_at')
        ->orderBy('created_at', 'desc')
        ->get();

    $initialNotifications = \App\Http\Resources\NotificationResource::collection($unreadNotifications);
    $unreadCount = $unreadNotifications->count();
@endphp

<div id="app">
    {{-- Example for General Notifications --}}
    <notification-dropdown
        title="General Notifications"
        sse-url="{{ route('notifications.pollStream') }}"
        mark-read-url="{{ route('notifications.markRead') }}"
        :initial-notifications='@json($initialNotifications)'
        :initial-unread-count="{{ $unreadCount }}"
    >
        <template #anchor>
            <i class="las la-bell" style="font-size: 24px;"></i>
        </template>
    </notification-dropdown>

    {{-- Example for another type of notification, e.g., Messages --}}
    {{-- <notification-dropdown
        title="Messages"
        sse-url="{{ route('messages.sseStream') }}"
        mark-read-url="{{ route('messages.markRead') }}"
        :initial-notifications='@json($initialMessages)'
        :initial-unread-count="{{ $unreadMessageCount }}"
    >
        <template #anchor>
            <i class="las la-envelope" style="font-size: 24px;"></i>
        </template>
    </notification-dropdown> --}}
</div>
```

> **Note:** The database queries are written to support both standard numeric/UUID user IDs and MongoDB `ObjectId`s. You can simplify this to `->where('notifiable_id', $userId)` if you are not using MongoDB.

***

## 3. Backend Setup (Laravel)

The backend provides the SSE stream and the endpoint to mark notifications as read.

### 3.1. Shared Components (Required for Both Methods)

#### a. Notification Resource

This resource standardizes the JSON format for notifications sent to the frontend.

```bash theme={null}
php artisan make:resource NotificationResource
```

**`app/Http/Resources/NotificationResource.php`**

```php theme={null}
<?php
namespace App\Http\Resources;
use Illuminate\Http\Resources\Json\JsonResource;

class NotificationResource extends JsonResource
{
    public function toArray($request)
    {
        return [
            'id' => $this->id,
            'title' => data_get($this->data, 'title', 'Notification'),
            'message' => data_get($this->data, 'message', 'You have a new update.'),
            'type' => data_get($this->data, 'type', 'info'),
            'read_at' => $this->read_at,
            'created_at' => $this->created_at->toDateTimeString(),
        ];
    }
}
```

#### b. `NotificationController` & Routes

This controller contains the logic for the SSE streams and marking notifications as read.

**`routes/web.php`**

```php theme={null}
use App\Http\Controllers\NotificationController;

Route::middleware('auth')->group(function () {
    // Endpoints for Method 1: Polling
    Route::get('/notification/poll-stream', [NotificationController::class, 'pollStream'])->name('notifications.pollStream');

    // Endpoints for Method 2: Redis Pub/Sub
    Route::get('/notification/pubsub-stream', [NotificationController::class, 'pubsubStream'])->name('notifications.pubsubStream');

    // Shared endpoint
    Route::post('/notifications/mark-all-read', [NotificationController::class, 'markAllRead'])->name('notifications.markRead');
});
```

### 3.2. Method 1: Database Polling Stream (Simple)

This method queries the database every few seconds for new notifications.

#### a. Controller Method

**`app/Http/Controllers/NotificationController.php`**

```php theme={null}
<?php

namespace App\Http\Controllers;

use App\Models\Notification;
use Illuminate\Support\Facades\Auth;
use MongoDB\BSON\ObjectId;
use Symfony\Component\HttpFoundation\StreamedResponse;

class NotificationController extends Controller
{
    public function markAllRead() { /* ... see below ... */ }

    public function pollStream()
    {
        session()->save();
        $response = new StreamedResponse(function () {
            $userId = Auth::id();
            $lastCheck = now();

            while (true) {
                if (connection_aborted()) break;

                $newNotifications = Notification::where(function($q) use ($userId) {
                        $q->where('notifiable_id', $userId)->orWhere('notifiable_id', new ObjectId($userId));
                    })
                    ->whereNull('read_at')
                    ->where('created_at', '>', $lastCheck)
                    ->orderBy('created_at', 'asc')
                    ->get();

                if ($newNotifications->isNotEmpty()) {
                    foreach ($newNotifications as $notification) {
                        $payload = (new \App\Http\Resources\NotificationResource($notification))->toJson();
                        echo "event: new-notification\n";
                        echo "data: {$payload}\n\n";
                    }
                    $lastCheck = $newNotifications->last()->created_at;
                }

                echo ": heartbeat\n\n";
                if (ob_get_level() > 0) ob_flush();
                flush();
                sleep(3);
            }
        });
        $response->headers->set('Content-Type', 'text/event-stream');
        $response->headers->set('Cache-Control', 'no-cache');
        $response->headers->set('X-Accel-Buffering', 'no');
        return $response;
    }
}
```

#### b. Mark All Read Method

**`app/Http/Controllers/NotificationController.php`**

```php theme={null}
public function markAllRead()
{
    $userId = Auth::id();
    Notification::where(function($q) use ($userId) {
            $q->where('notifiable_id', $userId)->orWhere('notifiable_id', new ObjectId($userId));
        })
        ->whereNull('read_at')
        ->update(['read_at' => now()]);

    return response()->json(['status' => 'success']);
}
```

### 3.3. Method 2: Redis Pub/Sub Stream (Recommended)

This event-driven method is highly efficient and provides instant updates.

#### a. Prerequisites & Configuration

1. Install Redis server and the `phpredis` extension.
2. Install Predis: `composer require predis/predis`
3. Configure `.env`:

```dotenv theme={null}
BROADCAST_DRIVER=redis
REDIS_HOST=127.0.0.1
REDIS_PORT=6379
```

#### b. Event, Observer, and Channel Auth

1. **Create Event:**

```bash theme={null}
php artisan make:event NotificationCreated --broadcast
```

Configure the event to format the broadcast payload using your `NotificationResource`.
**`app/Events/NotificationCreated.php`**

```php theme={null}
<?php
namespace App\Events;

use App\Http\Resources\NotificationResource;
use Illuminate\Broadcasting\Channel;
use Illuminate\Broadcasting\InteractsWithSockets;
use Illuminate\Contracts\Broadcasting\ShouldBroadcast;
use Illuminate\Foundation\Events\Dispatchable;
use Illuminate\Notifications\DatabaseNotification;
use Illuminate\Queue\SerializesModels;

class NotificationCreated implements ShouldBroadcast
{
    use Dispatchable, InteractsWithSockets, SerializesModels;

    public function __construct(public DatabaseNotification $notification) {}

    public function broadcastOn(): Channel
    {
        return new Channel('laravel_database_private-notifications.' . $this->notification->notifiable_id);
    }

    public function broadcastAs(): string
    {
        // The event name the frontend will listen for
        return 'new-notification';
    }

    public function broadcastWith(): array
    {
        // This structure is what the SSE controller will receive
        return ['data' => new NotificationResource($this->notification)];
    }
}
```

2. **Create Observer:**

```bash theme={null}
php artisan make:observer NotificationObserver --model="Notifications\DatabaseNotification"
```

In the `created` method, dispatch the event whenever a new notification is saved to the database.
**`app/Observers/NotificationObserver.php`**

```php theme={null}
<?php
namespace App\Observers;

use App\Events\NotificationCreated;
use Illuminate\Notifications\DatabaseNotification;

class NotificationObserver
{
    public function created(DatabaseNotification $notification): void
    {
        broadcast(new NotificationCreated($notification));
    }
}
```

3. **Register Observer:** In `app/Providers/EventServiceProvider.php`, register the observer in the `boot` method:

```php theme={null}
\Illuminate\Notifications\DatabaseNotification::observe(\App\Observers\NotificationObserver::class);
```

4. **Authorize Channel:** In `routes/channels.php`, authorize the private channel:

```php theme={null}
Broadcast::channel('notifications.{userId}', fn($user, $userId) => (int) $user->id === (int) $userId);
```

#### c. Controller Method

**`app/Http/Controllers/NotificationController.php`**

```php theme={null}
use Illuminate\Support\Facades\Redis;
// ... other imports

public function pubsubStream()
{
    session()->save();
    $response = new StreamedResponse(function () {
        $userId = Auth::id();
        $channel = "laravel_database_private-notifications.{$userId}";

        Redis::psubscribe([$channel], function ($message, $channel) {
            $eventPayload = json_decode($message);
            $eventName = $eventPayload->event;
            // The ->data->data structure matches what broadcastWith() returns
            $data = json_encode($eventPayload->data->data);

            echo "event: {$eventName}\n";
            echo "data: {$data}\n\n";

            if (ob_get_level() > 0) ob_flush();
            flush();
            if (connection_aborted()) return;
        });
    });
    $response->headers->set('Content-Type', 'text/event-stream');
    $response->headers->set('Cache-Control', 'no-cache');
    $response->headers->set('X-Accel-Buffering', 'no');
    return $response;
}
```

### 3.4. How to Send Notifications (Works for Both Methods)

Simply use Laravel's standard notification system. The backend setup (either polling or the observer) will automatically handle the rest.

```php theme={null}
use App\Notifications\YourNotificationClass;
$user->notify(new YourNotificationClass($data));
```

## 4. Server Configuration (Important!)

SSE connections are long-lived and can cause `504 Gateway Timeout` errors if the server is not configured correctly. You must disable proxy buffering for the SSE routes.

#### Nginx

```nginx theme={null}
location ~ ^/(notification/poll-stream|notification/pubsub-stream)$ {
    proxy_buffering off;
    proxy_cache off;
    proxy_read_timeout 3600s; # 1 hour
    # ... include other fastcgi_params ...
    fastcgi_pass unix:/var/run/php/php8.1-fpm.sock;
}
```

#### Apache

```apache theme={null}
<LocationMatch "^/(notification/poll-stream|notification/pubsub-stream)">
    ProxyTimeout 3600
</LocationMatch>
```

***

## Dokumentasi Komponen Notifikasi Dropdown Berbasis SSE

### 1. Ringkasan

Dokumen ini menyediakan instruksi bagi developer untuk mengimplementasikan dan menggunakan komponen dropdown notifikasi real-time berbasis SSE (Server-Sent Events). Komponen ini dibangun dengan Vue.js 2 dan dirancang untuk bekerja dengan backend Laravel. Komponen ini mendukung dua metode pembaruan real-time: stream *Database Polling* yang sederhana dan stream *Redis Pub/Sub* yang berperforma tinggi.

#### Fitur Utama

* **Pembaruan Real-Time:** Mendorong notifikasi dari server ke klien tanpa perlu memuat ulang halaman.
* **Dukungan Backend Ganda:** Pilih antara polling sederhana atau Redis yang berperforma tinggi.
* **Sangat Mudah Disesuaikan:** Menggunakan *props* dan *slots* untuk kustomisasi tampilan dan fungsionalitas.
* **Efisien:** Jauh lebih hemat sumber daya dibandingkan polling tradisional di sisi klien (misalnya, `setInterval`).
* **Mandiri:** Mengelola statusnya sendiri, termasuk jumlah notifikasi yang belum dibaca dan daftar notifikasi.

***

## 2. Penggunaan Frontend (Komponen Vue)

Bagian ini membahas cara mengintegrasikan komponen `NotificationDropdown.vue` ke dalam komponen induk Vue atau file Blade.

### 2.1. Prasyarat

Pastikan Anda telah menginstal `axios` di proyek Anda untuk fungsionalitas "Tandai semua telah dibaca".

```bash theme={null}
npm install axios
```

### 2.2. Properti Komponen (Props)

| Prop                   | Tipe   | Wajib | Default           | Deskripsi                                                                |
| :--------------------- | :----- | :---- | :---------------- | :----------------------------------------------------------------------- |
| `title`                | String | Tidak | `'Notifications'` | Judul yang ditampilkan di bagian atas daftar dropdown.                   |
| `sseUrl`               | String | Ya    | `-`               | URL endpoint untuk stream Server-Sent Events.                            |
| `markReadUrl`          | String | Ya    | `-`               | URL endpoint untuk request POST "Tandai semua telah dibaca".             |
| `initialNotifications` | Array  | Tidak | `[]`              | Array berisi objek notifikasi yang dimuat awal saat halaman dibuka.      |
| `initialUnreadCount`   | Number | Tidak | `0`               | Jumlah awal notifikasi yang belum dibaca untuk ditampilkan pada *badge*. |

### 2.3. Slot Komponen

#### a. `anchor`

Slot ini memungkinkan Anda untuk mengkustomisasi ikon/tombol pemicu untuk dropdown.

**Contoh:**

```html theme={null}
<notification-dropdown ...>
    <template #anchor>
        <i class="fas fa-envelope" style="font-size: 24px;"></i>
    </template>
</notification-dropdown>
```

#### b. `item`

Slot ini memberikan kontrol penuh atas bagaimana setiap notifikasi dalam daftar ditampilkan. Slot ini menerima objek `notification` sebagai properti *scoped*.

**Contoh:**

```html theme={null}
<notification-dropdown ...>
    <template #item="{ notification }">
        <a :href="notification.url" class="custom-item">
            <div class="custom-icon-wrapper">...</div>
            <div class="custom-content">
                <strong>{{ notification.title }}</strong>
                <p>{{ notification.message }}</p>
                <small>{{ notification.created_at }}</small>
            </div>
        </a>
    </template>
</notification-dropdown>
```

### 2.4. Contoh Lengkap Komponen Induk

Berikut adalah cara menyiapkan komponen induk (atau file Blade dengan instance Vue) untuk menggunakan dropdown notifikasi.

#### a. File Blade (`dashboard.blade.php`)

```php theme={null}
@php
    // Ambil dan format notifikasi awal di controller yang me-render view ini
    $userId = auth()->id();
    $unreadNotifications = \App\Models\Notification::where(function($q) use ($userId) {
            $q->where('notifiable_id', '=', $userId)
              ->orWhere('notifiable_id', '=', new \MongoDB\BSON\ObjectId($userId));
        })
        ->whereNull('read_at')
        ->orderBy('created_at', 'desc')
        ->get();

    $initialNotifications = \App\Http\Resources\NotificationResource::collection($unreadNotifications);
    $unreadCount = $unreadNotifications->count();
@endphp

<div id="app">
    {{-- Contoh untuk Notifikasi Umum --}}
    <notification-dropdown
        title="Notifikasi Umum"
        sse-url="{{ route('notifications.pollStream') }}"
        mark-read-url="{{ route('notifications.markRead') }}"
        :initial-notifications='@json($initialNotifications)'
        :initial-unread-count="{{ $unreadCount }}"
    >
        <template #anchor>
            <i class="las la-bell" style="font-size: 24px;"></i>
        </template>
    </notification-dropdown>
</div>
```

> **Catatan:** Query database ditulis untuk mendukung ID pengguna standar (numerik/UUID) dan `ObjectId` MongoDB. Anda dapat menyederhanakannya menjadi `->where('notifiable_id', $userId)` jika Anda tidak menggunakan MongoDB.

***

## 3. Penyiapan Backend (Laravel)

Backend menyediakan stream SSE dan endpoint untuk menandai notifikasi telah dibaca.

### 3.1. Komponen Bersama (Dibutuhkan untuk Kedua Metode)

#### a. Notification Resource

Resource ini berfungsi untuk menstandarisasi format JSON notifikasi yang dikirim ke frontend.

```bash theme={null}
php artisan make:resource NotificationResource
```

**`app/Http/Resources/NotificationResource.php`**

```php theme={null}
<?php
namespace App\Http\Resources;
use Illuminate\Http\Resources\Json\JsonResource;

class NotificationResource extends JsonResource
{
    public function toArray($request)
    {
        return [
            'id' => $this->id,
            'title' => data_get($this->data, 'title', 'Notifikasi'),
            'message' => data_get($this->data, 'message', 'Anda memiliki pembaruan baru.'),
            'type' => data_get($this->data, 'type', 'info'),
            'read_at' => $this->read_at,
            'created_at' => $this->created_at->toDateTimeString(),
        ];
    }
}
```

#### b. `NotificationController` & Routes

Controller ini berisi logika untuk stream SSE dan menandai notifikasi telah dibaca.

**`routes/web.php`**

```php theme={null}
use App\Http\Controllers\NotificationController;

Route::middleware('auth')->group(function () {
    // Endpoint untuk Metode 1: Polling
    Route::get('/notification/poll-stream', [NotificationController::class, 'pollStream'])->name('notifications.pollStream');

    // Endpoint untuk Metode 2: Redis Pub/Sub
    Route::get('/notification/pubsub-stream', [NotificationController::class, 'pubsubStream'])->name('notifications.pubsubStream');

    // Endpoint bersama
    Route::post('/notifications/mark-all-read', [NotificationController::class, 'markAllRead'])->name('notifications.markRead');
});
```

### 3.2. Metode 1: Stream Database Polling (Sederhana)

Metode ini melakukan query ke database setiap beberapa detik untuk mencari notifikasi baru.

#### a. Metode Controller

**`app/Http/Controllers/NotificationController.php`**

```php theme={null}
<?php
// ... imports ...
use App\Models\Notification;
use MongoDB\BSON\ObjectId;

class NotificationController extends Controller
{
    public function markAllRead() { /* ... lihat di bawah ... */ }

    public function pollStream()
    {
        // ... (Code as above) ...
    }
}
```

#### b. Metode Mark All Read

**`app/Http/Controllers/NotificationController.php`**

```php theme={null}
public function markAllRead()
{
    $userId = Auth::id();
    Notification::where(function($q) use ($userId) {
            $q->where('notifiable_id', $userId)->orWhere('notifiable_id', new ObjectId($userId));
        })
        ->whereNull('read_at')
        ->update(['read_at' => now()]);

    return response()->json(['status' => 'success']);
}
```

### 3.3. Metode 2: Stream Redis Pub/Sub (Disarankan)

Metode berbasis event ini sangat efisien dan memberikan pembaruan instan.

#### a. Prasyarat & Konfigurasi

1. Instal server Redis dan ekstensi `phpredis`.
2. Install Predis: `composer require predis/predis`
3. Konfigurasi `.env`:

```dotenv theme={null}
BROADCAST_DRIVER=redis
REDIS_HOST=127.0.0.1
REDIS_PORT=6379
```

#### b. Event, Observer, dan Otorisasi Channel

1. **Buat Event:**

```bash theme={null}
php artisan make:event NotificationCreated --broadcast
```

Konfigurasikan event untuk memformat payload broadcast menggunakan `NotificationResource` Anda.
**`app/Events/NotificationCreated.php`**

```php theme={null}
// ... (Code as in English version) ...
```

2. **Buat Observer:**

```bash theme={null}
php artisan make:observer NotificationObserver --model="Notifications\DatabaseNotification"
```

Di metode `created`, panggil event setiap kali notifikasi baru disimpan ke database.
**`app/Observers/NotificationObserver.php`**

```php theme={null}
<?php
namespace App\Observers;

use App\Events\NotificationCreated;
use Illuminate\Notifications\DatabaseNotification;

class NotificationObserver
{
    public function created(DatabaseNotification $notification): void
    {
        broadcast(new NotificationCreated($notification));
    }
}
```

3. **Daftarkan Observer:** Di `app/Providers/EventServiceProvider.php`, daftarkan observer di metode `boot`:

```php theme={null}
\Illuminate\Notifications\DatabaseNotification::observe(\App\Observers\NotificationObserver::class);
```

4. **Otorisasi Channel:** Di `routes/channels.php`, otorisasi private channel:

```php theme={null}
Broadcast::channel('notifications.{userId}', fn($user, $userId) => (int) $user->id === (int) $userId);
```

#### c. Metode Controller

**`app/Http/Controllers/NotificationController.php`**

```php theme={null}
// ... (Code as in English version) ...
```

### 3.4. Cara Mengirim Notifikasi (Berlaku untuk Kedua Metode)

Cukup gunakan sistem notifikasi standar Laravel. Penyiapan backend (baik polling maupun observer) akan menangani sisanya secara otomatis.

```php theme={null}
use App\Notifications\YourNotificationClass;
$user->notify(new YourNotificationClass($data));
```

## 4. Konfigurasi Server (Penting!)

Koneksi SSE berjalan lama dan dapat menyebabkan error `504 Gateway Timeout` jika server tidak dikonfigurasi dengan benar. Anda harus menonaktifkan *proxy buffering* untuk route SSE.

#### Nginx

```nginx theme={null}
location ~ ^/(notification/poll-stream|notification/pubsub-stream)$ {
    proxy_buffering off;
    proxy_cache off;
    proxy_read_timeout 3600s; # 1 jam
    # ... sertakan fastcgi_params lainnya ...
    fastcgi_pass unix:/var/run/php/php8.1-fpm.sock;
}
```

#### Apache

```apache theme={null}
<LocationMatch "^/(notification/poll-stream|notification/pubsub-stream)">
    ProxyTimeout 3600
</LocationMatch>
```

***

### Addendum A: Testing with Artisan Command

To facilitate development and testing, a custom Artisan command is provided to send a test notification directly to any user.

#### A.1. Setup

##### a. Test Notification Class

```bash theme={null}
php artisan make:notification TestNotification
```

**`app/Notifications/TestNotification.php`**

```php theme={null}
<?php
namespace App\Notifications;
use Illuminate\Bus\Queueable;
use Illuminate\Notifications\Notification;

class TestNotification extends Notification
{
    use Queueable;

    public function __construct(public string $title, public string $message, public string $type) {}

    public function via($notifiable): array
    {
        return ['database']; // Essential for this system
    }

    public function toArray($notifiable): array
    {
        return [
            'title' => $this->title,
            'message' => $this->message,
            'type' => $this->type,
        ];
    }
}
```

##### b. Artisan Command

```bash theme={null}
php artisan make:command SendTestNotification
```

**`app/Console/Commands/SendTestNotification.php`**

```php theme={null}
<?php
namespace App\Console\Commands;

use App\Models\User;
use App\Notifications\TestNotification;
use Illuminate\Console\Command;

class SendTestNotification extends Command
{
    protected $signature = 'test:notification
                            {email : The email address of the user to notify}
                            {--title= : The title of the notification}
                            {--message= : The message content of the notification}
                            {--type= : The type for styling (info, success, warning, danger)}';

    protected $description = 'Sends a test database notification to a specified user.';

    public function handle(): int
    {
        $user = User::where('email', $this->argument('email'))->first();

        if (!$user) {
            $this->error("User with email '{$this->argument('email')}' not found.");
            return Command::FAILURE;
        }

        $title = $this->option('title') ?? 'Test Notification';
        $message = $this->option('message') ?? 'This is a test notification from Artisan.';
        $type = $this->option('type') ?? collect(['info', 'success', 'warning', 'danger'])->random();

        $this->info("Sending notification to: {$user->name}...");
        $user->notify(new TestNotification($title, $message, $type));
        $this->info('Notification sent successfully!');

        return Command::SUCCESS;
    }
}
```

#### A.2. Usage

##### a. Basic Command

```bash theme={null}
php artisan test:notification user@example.com
```

##### b. Command with Custom Options

```bash theme={null}
php artisan test:notification user@example.com --title="Urgent Update" --message="Your ticket has been closed." --type=danger
```

***

### Adendum A: Pengujian dengan Perintah Artisan

Untuk memfasilitasi pengembangan dan pengujian, disediakan sebuah perintah Artisan kustom untuk mengirim notifikasi tes langsung ke pengguna manapun.

#### A.1. Penyiapan

##### a. Kelas Notifikasi Tes

```bash theme={null}
php artisan make:notification TestNotification
```

**`app/Notifications/TestNotification.php`**

```php theme={null}
// ... (Code as in English version) ...
```

##### b. Perintah Artisan

```bash theme={null}
php artisan make:command SendTestNotification
```

**`app/Console/Commands/SendTestNotification.php`**

```php theme={null}
<?php
namespace App\Console\Commands;

use App\Models\User;
use App\Notifications\TestNotification;
use Illuminate\Console\Command;

class SendTestNotification extends Command
{
    protected $signature = 'test:notification
                            {email : Alamat email pengguna yang akan diberi notifikasi}
                            {--title= : Judul notifikasi}
                            {--message= : Konten pesan notifikasi}
                            {--type= : Tipe untuk gaya (info, success, warning, danger)}';

    protected $description = 'Mengirim notifikasi tes via database ke pengguna yang ditentukan.';

    public function handle(): int
    {
        // ... (Logic as in English version) ...
    }
}
```

#### A.2. Cara Penggunaan

##### a. Perintah Dasar

```bash theme={null}
php artisan test:notification pengguna@example.com
```

##### b. Perintah dengan Opsi Kustom

```bash theme={null}
php artisan test:notification pengguna@example.com --title="Pembaruan Penting" --message="Tiket Anda telah ditutup." --type=danger
```
